
Today I want to share a quick tip for driving display logic in UI components—and I think it’s easier to see in an example.
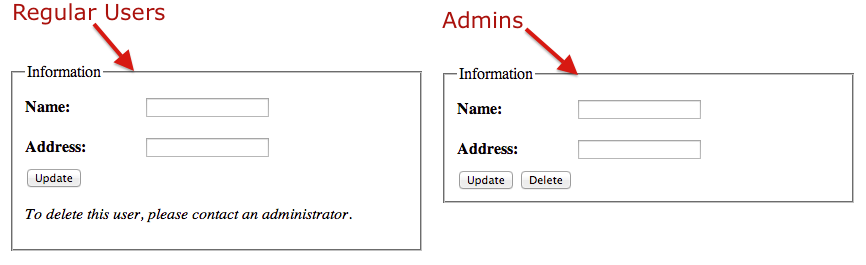
Suppose you are tasked with implementing a form that can be used by two types of users: admins and regular users. Admins should be able to delete, and regular users should see an informational message. The display of this form is shown below:
Note: You can view the final example of this code at http://jsfiddle.net/tj_vantoll/77TbG/ if you’d like to follow along.
Here’s the HTML we’ll use:
<form id="information-form">
    <fieldset>
        <legend>Information</legend>
        <div>
            <label for="name">Name:</label>
            <input id="name">
        </div>
        <div>
            <label for="address">Address:</label>
            <input id="address">
        </div>

        <button>Update</button>
        <button id="delete">Delete</button>

        <p id="admin-message">To delete this user, please contact an administrator.</p>
    </fieldset>
</form>
And we’ll use two buttons to switch between the two user types.
<button id="admin">Display as admin</button>
<button id="regular-user">Display as regular user</button>
So, the question is… what JavaScript do you implement to show/hide the delete button and informational message? The following shows an approach I often see: targeting individual elements in JavaScript, and altering their display.
var adminButton = document.querySelector( "#admin" ),
    regularButton = document.querySelector( "#regular-user" ),
    deleteButton = document.querySelector( "#delete" ),
    adminMessage = document.querySelector( "#admin-message" );

adminButton.addEventListener( "click", function() {
    deleteButton.style.display = "inline-block";
    adminMessage.style.display = "none";
});
regularButton.addEventListener( "click", function() {
    deleteButton.style.display = "none";
    adminMessage.style.display = "block";
});
This works, but it’s verbose, as you have to target each element that should be shown or hidden whenever the user types changes. From a more abstract perspective, it also breaks the separation of concerns design principle, since CSS changes are being done in JavaScript.
To improve this, let’s switch the JavaScript to manage a single CSS class name on the form.
var adminButton = document.querySelector( "#admin" ),
    regularButton = document.querySelector( "#regular-user" ),
    form = document.querySelector( "#information-form" );

adminButton.addEventListener( "click", function() {
    form.classList.add( "admin" );
});
regularButton.addEventListener( "click", function() {
    form.classList.remove( "admin" );
});
At the moment, nothing shows or hides when you click buttons, but with the "admin" class name in place, you have the hook you need to implement the logic in CSS.
#delete {
    display: none;
}
.admin #admin-message {
    display: none;
}
.admin #delete {
    display: inline-block;
}
JavaScript manages the state of the element, which gives CSS the ability to control the display based on that state. This approach is not only cleaner, it is also more flexible. If you need to change colors for admin, or spacing, you now have a CSS hook you can use to do so.
This same approach works with HTML attributes as well. For instance, let’s switch from using a CSS class name, to a data-admin attribute on the <form>. With that approach you use the following JavaScript:
var adminButton = document.querySelector( "#admin" ),
    regularButton = document.querySelector( "#regular-user" ),
    form = document.querySelector( "#information-form" );

adminButton.addEventListener( "click", function() {
    form.setAttribute( "data-admin", true );
});
regularButton.addEventListener( "click", function() {
    form.setAttribute( "data-admin", false );
});
And the following CSS:
#delete {
    display: none;
}
[data-admin="true"] #admin-message {
    display: none;
}
[data-admin="true"] #delete {
    display: inline-block;
}
Use whatever makes sense for your use case. The overarching idea is to use JavaScript to apply semantic HTML that reflects an element’s state, and to let CSS control the display from there. Personally I’ve found this to be the best way to handle display logic in UI components—especially complex ones.